In this article, we will focus on the outdoor uses and versatility of hammocks. Depending on the model of the hammock, it can actually be a high-grade piece of furniture. Each hammock model may have certain attractive designs: outdoor hammocks, portable hammocks, or even traditional hammocks.
If you don’t have a hammock with a stand, you’ll have to settle with hanging your hammock with ropes.
In my personal experience camping, having a hammock around adds an interesting sense of style and comfort to the outdoors. Branching out from our human connection into nature obviously involves the ability to survive in nature and be a catalyst for new experiences and learning new skills. So, why not find new ways of relaxing outdoors as well? Knowing how to put up and maintain a hammock is a good start to other outdoor skills and hobbies. This article will go step-by-step on the basics of hammocks, in terms of different potential setups.
How to Tie Hammock Knots
There are multiple ways to create knots for hammocks, but be aware that there is no single method to use for tying a hammock. I have had some good experiences using knots that are built to last; the best part is you can use any kind of rope for these. Here are the most useful knots for hammocks:
Two Half Hitches
A half hitch is a basic knot that sets the foundation for other knots. It can be accomplished with little practice, but for it to work best, additional knots would be needed for it to hold. Here are the steps:
- Create a loop wrapped around a structural object or a tree trunk. The object must be sturdy and big enough to handle significant weight. Be sure to clear the area around the trunk if there are branches in the way.
- Make another loop from the loose end that wraps the length that is already hanging and secured.
- Now to further secure it, make another loop, same as before. The double loop will resemble a pretzel. All that’s left to do is to sinch it tight by pulling the through-line until it tightens against itself on the pole.
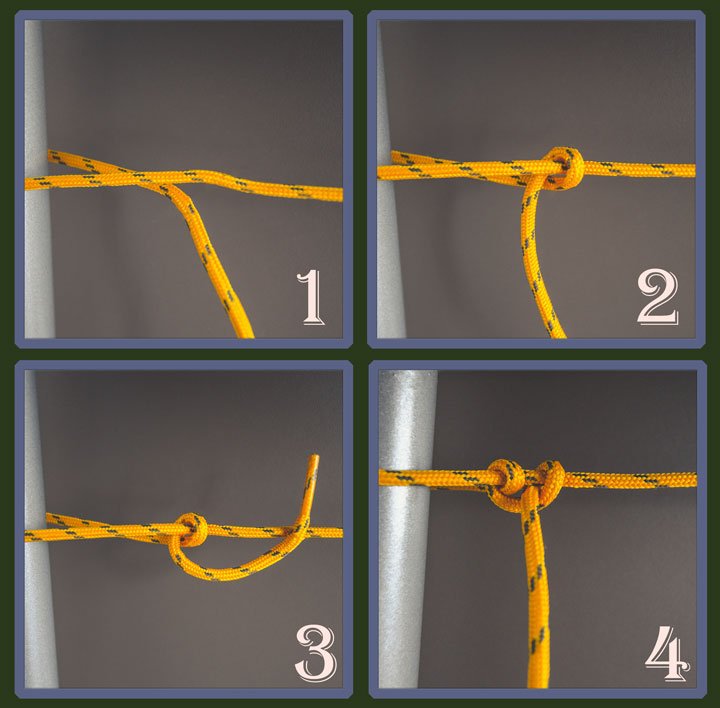
Bowline Knot
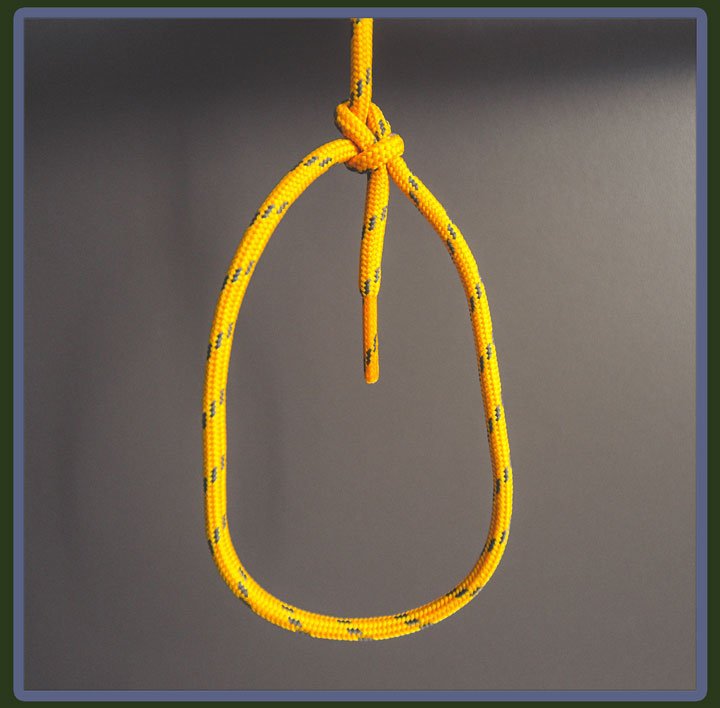
Bowline knots are useful because they can be used for many purposes and be secured on any section or length of rope. Its simplicity makes it just as essential because of its strength. Here are the steps:
- Near the end of a rope make a small loop.
- Using the end of the rope, make another larger loop bypass in the tail end through the small loop.
- After that, pass the tail end around the free length of rope back into the small loop to complete the knot.
Clove Hitch
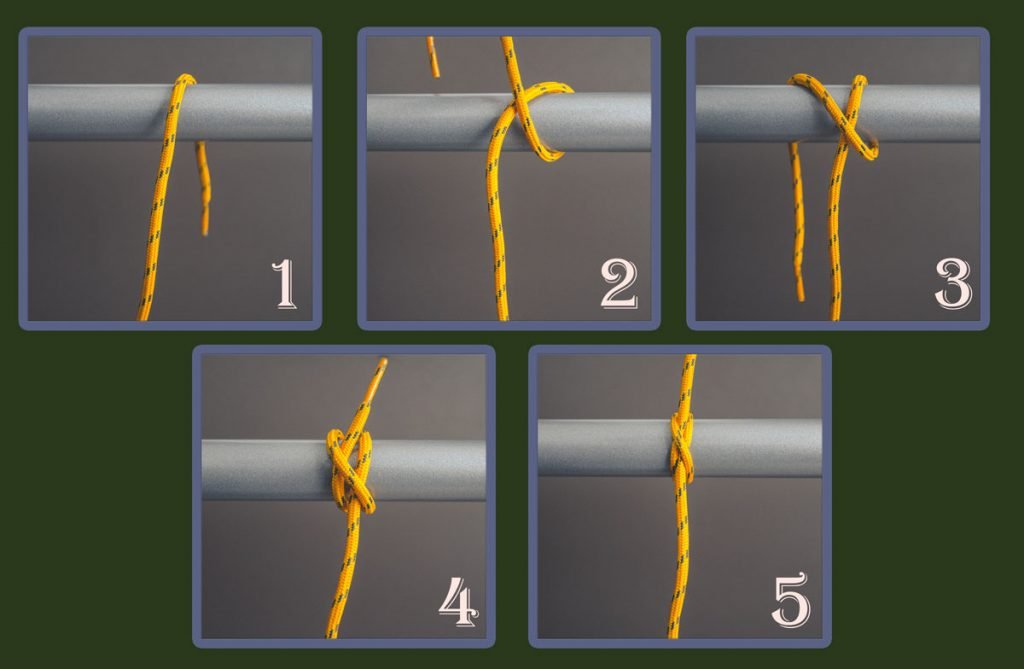
A clove hitch is great for long-lasting and reliable use – and it’s adjustable. It is probably the best for holding a hammock and has a low failure rate, even if you use it at long lengths up to ten feet. Here are the steps:
- First, pass the end of the rope around a pole and then cross the end over to the standing side of the rope, making a cross-section.
- Thread the end back under the wrapped portion that passes between the cross-section or “X” pull the end up and through.
Falconer’s Knot
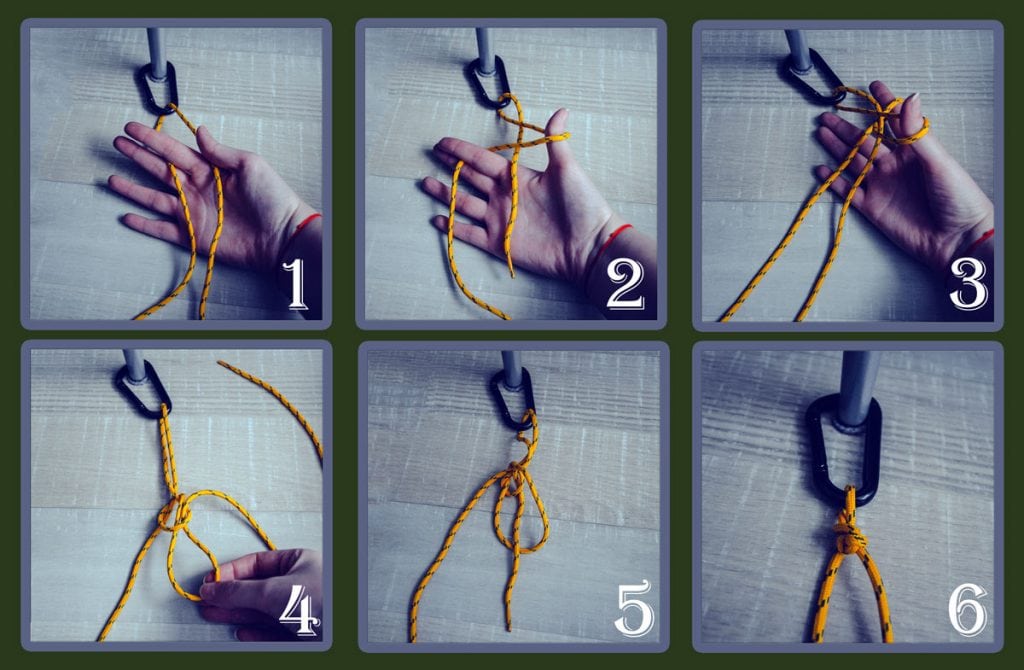
The primary use for this knot is in falconry (thus, the name falconer’s knot) but has many uses beyond tethering a bird. As shown above, this type of system should be used with a carabiner for added security. This knot is usually done with one hand, to keep the other free to work with the bird. The steps are as follow:
- First, have the free end in your left hand, the tail end is in your right hand. Wrap the rope once around the post or anchor point.
- You must secure the rope before going any further, accomplished by securing the tail end between the index and middle finger of the right hand. With an open right hand, the end used for the knot will run across your open palm.
- Keeping both ends of the rope pulled tight, use your thumb to catch the inside of the open loop to pass it overhand, so that the loop becomes a closed loop, like an “X”.
- To finish, pull the open end under and across the loop and push the open end through the loop to create a second closed loop, then pull the knot tight by the open end. To lock the knot in place, pass the excess through the closed second loop.
Double Bowline
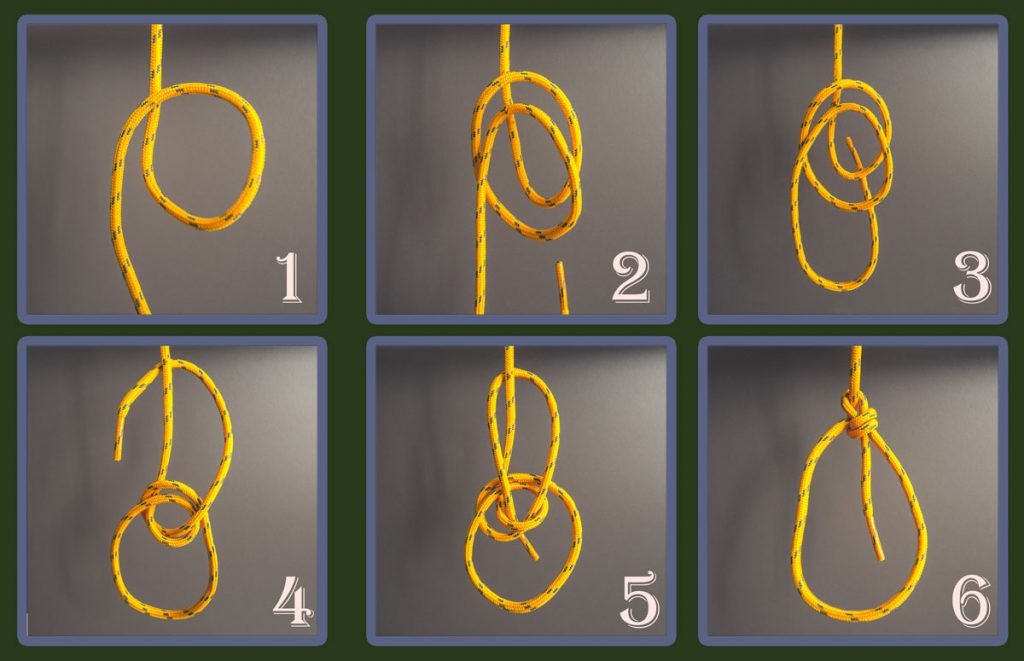
A double bowline knot is just another progression from the original, and is often used for rock climbing, but is basically the same in how it’s created, except for a few extra steps. Here it is as follows:
- Starting out with two small loops close together near the end of the rope, as shown above, they should overlap on top of each other.
- Pass the end through the standing part of the rope where the two loops are, then pass it through again, but cross over the free end and then back into the loops.
- Tighten the two remaining free-standing ends to tighten the double loop into a knot.
Hammock Hanging Alternatives
From a best-case scenario to an improvisational lesson enabling you to have other options for putting up a hammock, this section will go over other options for hanging a hammock. Some are designed to be minimalist and easy to put up, but it still is to your benefit to know the alternatives.
So then, what are the alternatives?
Hammock Straps
Using this method of hanging a hammock is great for indoor or outdoor use, because of its ease of adjustment. The idea is that this type of setup will not require ropes or tying of the ends. But instead, a strap can be fastened with nylon material or webbing that can hold significant weight.
It is simple and can be hung from posts, porches, or trees. The design of the straps is to make it less constricting to the trees that are used to hang the hammock causing less environmental impact. If you are familiar with a pulley system used for towing or securing items, this system will be familiar to you.
Built-In Carabiners
This type of hammock is popular for indoor use-depending on how its hung and the desired durability. It can be hung by a simple rope system or tree straps, as well as by chains, if preferred. This type can be used as a camping hammock with adjustments for durability. This setup works well with a hammock suspension system used for a chair hammock, although it would be mainly for indoor use.
Other Considerations for a Hammock
With endless options for hammocks, it is understandable to try to find comparisons between the hammock you need versus the hammock you want. But regardless of the options, you will want high quality over anything else. Do you want an indoor or outdoor hammock, or both? What kind of materials should it be made from? What size should it be? How complicated will it be to set up? All these questions are good places to start and should be a part of the final decision.
Material
To expand on what material is best…depends on your preference. Most materials used for hammocks need to be durable. There are three to choose from which vary in price.
- Olefin
- This material is the best-recommended material for consistent outdoor use. It’s made from a synthetic fibre that can handle harsh weather.
- Cotton
- This material is the most accessible due to wide availability. It can be easily blended with other fabrics to make it more durable and handle increased wear and tear. Most commonly it is mixed with polyester. On its own, though, it’s still quite strong.
- Polyester
- Another synthetic fibre that is long-lasting and is also easy to find. This material is used as a waterproof material sometimes, and is also elastic, which is great for making a hammock.
Size, Height, Weight & Setup
The other aspect of a hammock that cannot be overstated is its size. The best measurement is the exact height, dimensions, and even the weight limit the hammock is rated for.
Measurements should be taken as follow:
- The length of your hammock and the distance between anchor points should be measured.
- The height off the ground should be measured, but this may have a bit of a difference when weighted down, which is called the “sit height”. This measurement pertains to the height off the ground when the hammock is weighted down.
- The weight of the person using the hammock.
- The hang angle, which measures the angle between the suspension ropes and the ground. The ideal angle is 30°, as the max weight should be near or right at this angle. For example, a person weighing 175 to 200 lbs (79 to 90 kg). creates a “sit height” of 18 inches (45 cm) and the cord tension will hold at a distance of 15 feet between each tree (4.5 meters).
Final Thoughts
There really is no challenge to this if you decide to find a hammock that is easy to set up but, for the purposes of learning the intricacies of knot tying and finding the best way to put up a hammock, there are creative ways to set it up. Using it as an opportunity to learn and grasp skills that can be used for other projects is a great way to self-educate; an investment in skills more than anything else.


I just can’t seem to get the hang of the knots I have a hammock in my apt I sleep in for my back problems .and I use a nylon hammock do yes it stretches in a few days and I find myself trying any knot that will work but I’m terrified it will come loose what the earliest and very knot.
Hi, I find this very useful when it comes to knots: https://amzn.to/3fXjGD1
I hope it helps 🙂